Overview
Database webhooks allow you to send realtime data from your database to another system whenever an event occurs in your table e.g. when a row is inserted, updated, or deleted, or when a specific column is updated. This guide shows you how to set up a Supabase database webhook and deploy a simple edge function that triggers a “Hello world” task every time a new row is inserted into your table.Prerequisites
- Ensure you have the Supabase CLI installed
- Ensure TypeScript is installed
- Create a Trigger.dev account
- Create a new Trigger.dev project
Initial setup
Optional step 1: create a new Supabase project
If you already have a Supabase project on your local machine you can skip this step.
If you are using VS Code, ensure to answer ‘y’ when asked to generate VS Code settings for Deno,
and install any recommended extensions.
Optional step 2: create package.json and tsconfig.json files
If your project does not already have Both of these files are required for the Trigger.dev SDK to work correctly.
package.json or/and tsconfig.json files (e.g. if you are using Deno), create them manually and add them to your project root folder. If your project has these files you can skip this step.
package.json
tsconfig.json
Run the CLI `init` command
The easiest way to get started is to use the CLI. It will add Trigger.dev to your existing project, create a It will do a few things:
/trigger folder and give you an example task.Run this command in the root of your project to get started:- Log you into the CLI if you’re not already logged in.
- Create a
trigger.config.tsfile in the root of your project. - Ask where you’d like to create the
/triggerdirectory. - Create the
/triggerdirectory with an example task,/trigger/example.[ts/js].
Run the CLI `dev` command
The CLI
dev command runs a server for your tasks. It watches for changes in your /trigger directory and communicates with the Trigger.dev platform to register your tasks, perform runs, and send data back and forth.It can also update your @trigger.dev/* packages to prevent version mismatches and failed deploys. You will always be prompted first.Perform a test run using the dashboard
The CLI 
dev command spits out various useful URLs. Right now we want to visit the Test page .You should see our Example task in the list , select it. Most tasks have a “payload” which you enter in the JSON editor , but our example task doesn’t need any input.Press the “Run test” button .

Create and deploy a new Supabase edge function and create a new database webhook
Add your Trigger.dev prod secret key in Supabase
First, go to your Trigger.dev project dashboard and copy the  Then, in Supabase, select the project you want to use, navigate to ‘Project settings’ , click ‘Edge functions’ in the configurations menu, and then click the ‘Add new secret’ button.Add
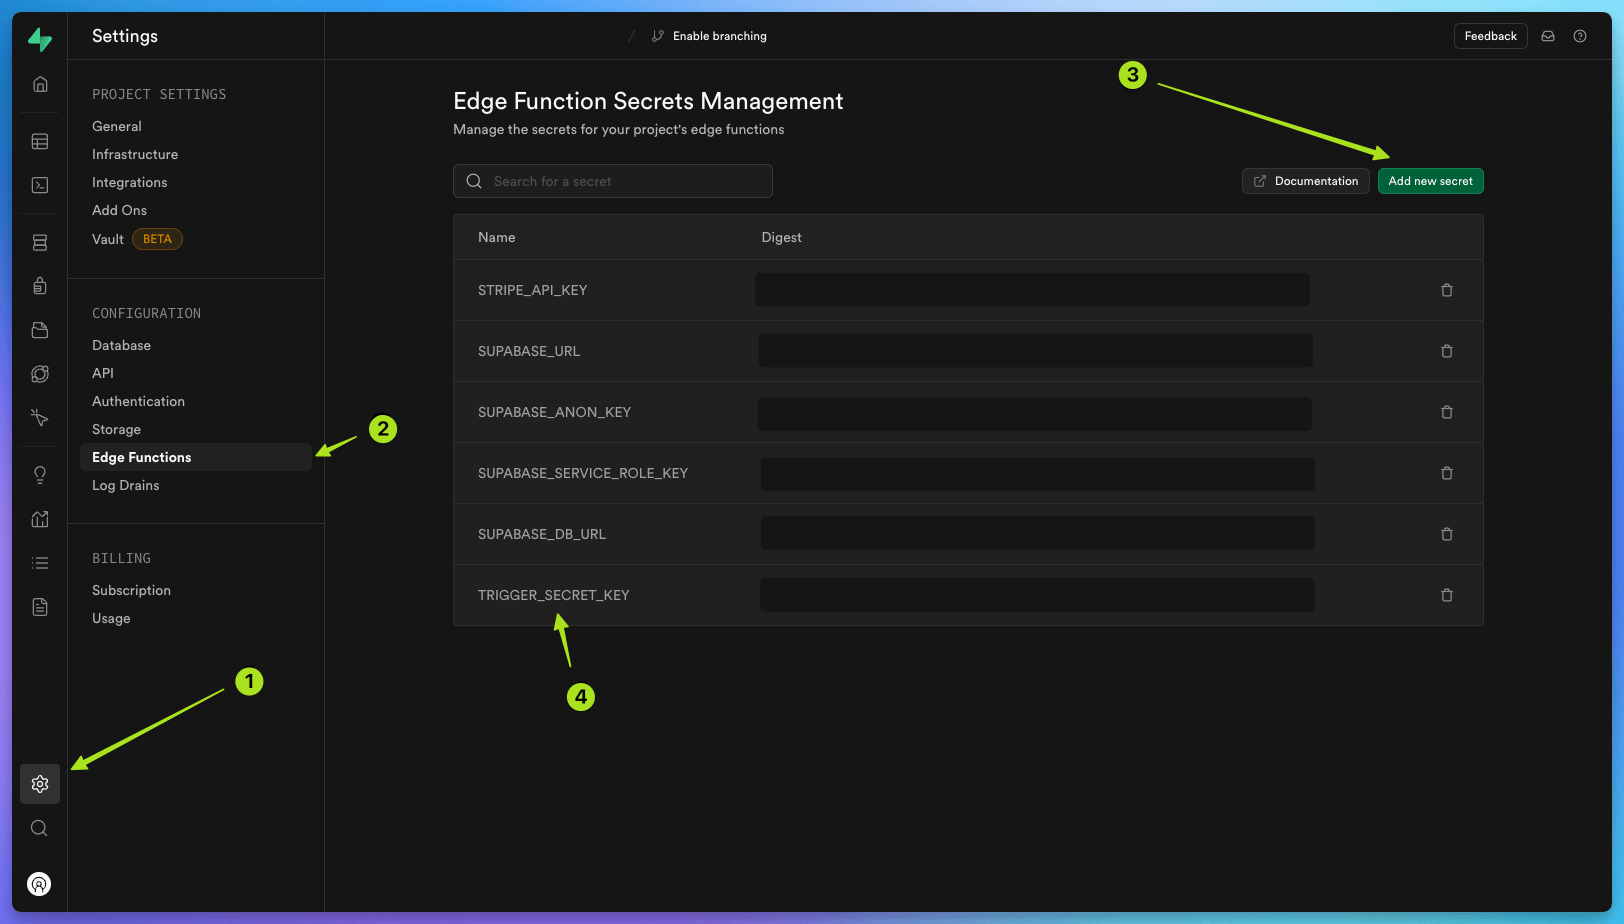
prod secret key from the API keys page.Then, in Supabase, select the project you want to use, navigate to ‘Project settings’ , click ‘Edge functions’ in the configurations menu, and then click the ‘Add new secret’ button.Add TRIGGER_SECRET_KEY with the pasted value of your Trigger.dev prod secret key.Create a new edge function using the Supabase CLI
Now create a new edge function using the Supabase CLI. We will call it
database-webhook.Update the edge function code
Replace the This code sets up a Deno server that listens for incoming JSON requests, triggers a “hello-world” task, logs the received payload, and responds with “ok”. This setup is typical for a webhook endpoint that processes incoming data and triggers some action (in this case, the “hello-world” task) based on that data.
database-webhook placeholder code with the following code:functions/database-webhook/index.ts
You can only import the
type from the task.Tasks in the
trigger folder use Node, so they must stay in there or they will not run,
especially if you are using a different runtime like Deno. Also do not add “npm:” to imports
inside your task files, for the same reason.Deploy your edge function using the Supabase CLI
Now deploy your edge function with the following command:Follow the CLI instructions, selecting the same project you added your
prod secret key to, and once complete you should see your new edge function deployment in your Supabase edge functions dashboard.There will be a link to the dashboard in your terminal output, or you can find it at this URL:https://supabase.com/dashboard/project/<your-project-id>/functionsReplace
your-project-id with your actual project ID.Create a new table
Next, in your Supabase project dashboard, click on ‘Table Editor’ in the left-hand menu and create a new table. 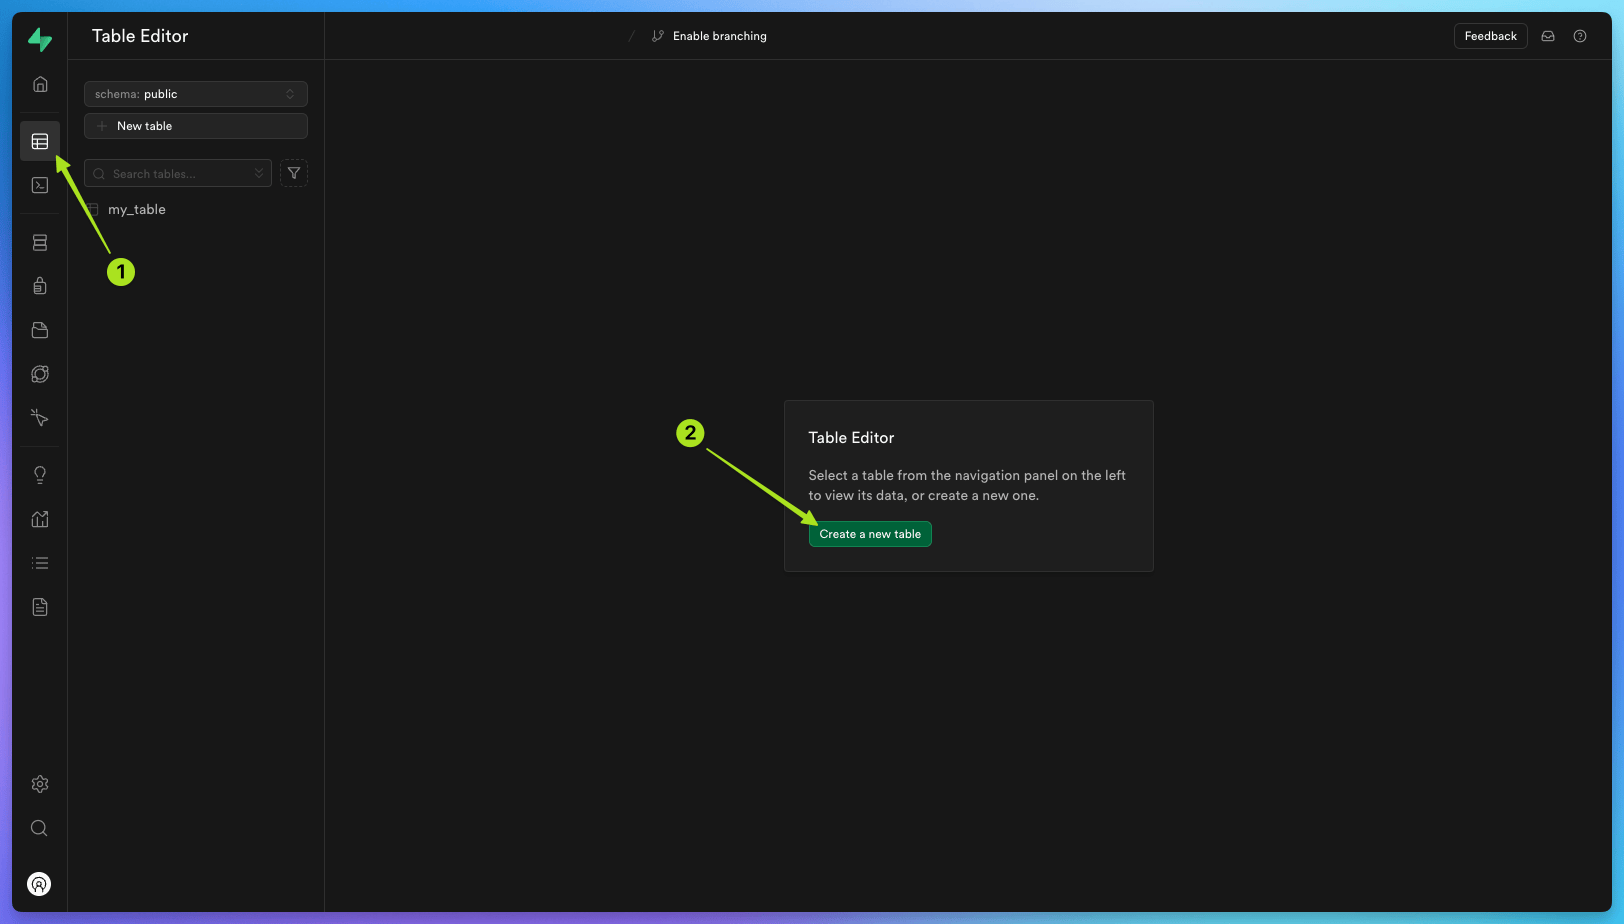 In this example we will call our table
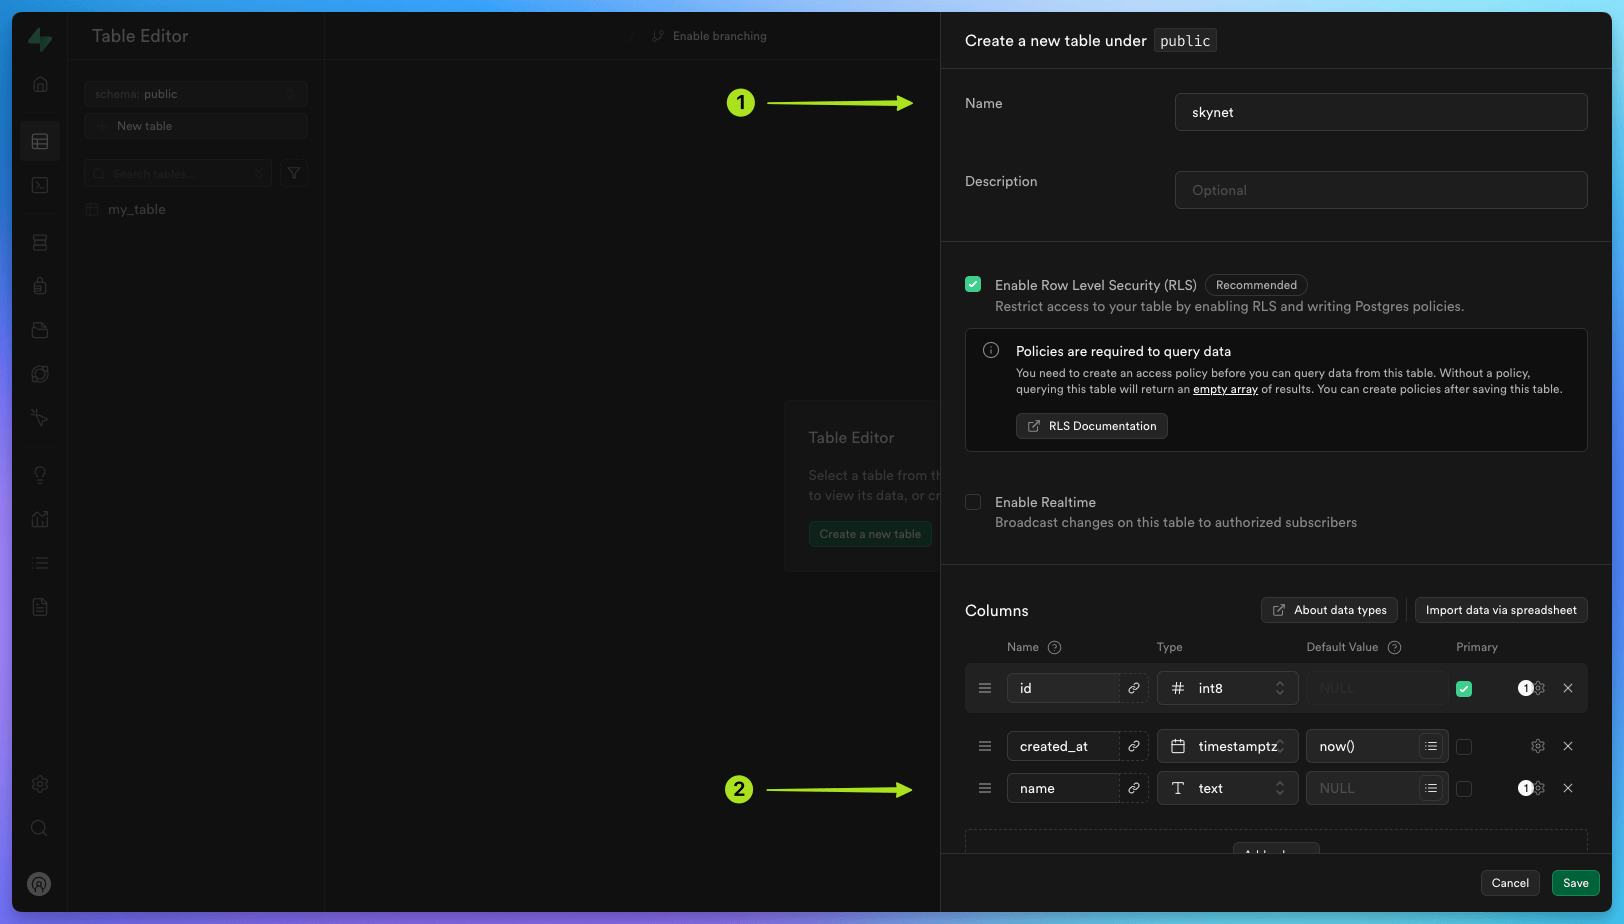
In this example we will call our table skynet. Add a new column called name with the type text. Configure JWT settings
By default, Supabase edge functions require a JSON Web Token JWT in the authorization header. This is to ensure that only authorized users can access your edge functions.In your Supabase project dashboard, click ‘Project settings’ , then the ‘API’ tab , and copy the 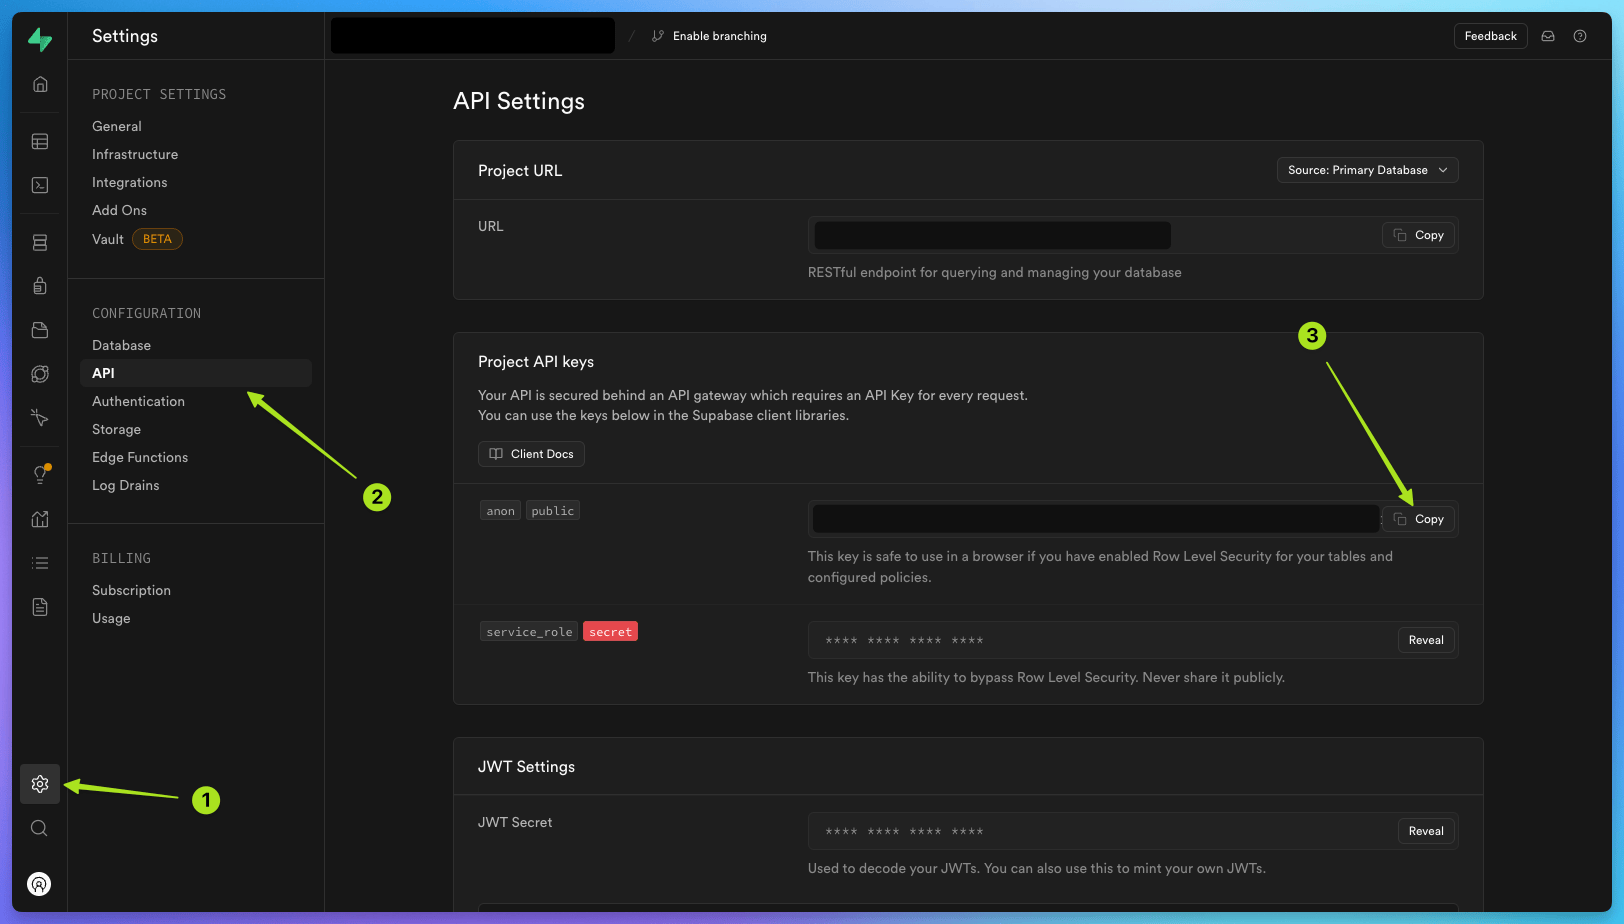 Then, go to ‘Database’ click on ‘Webhooks’ , and then click ‘Create a new hook’ .
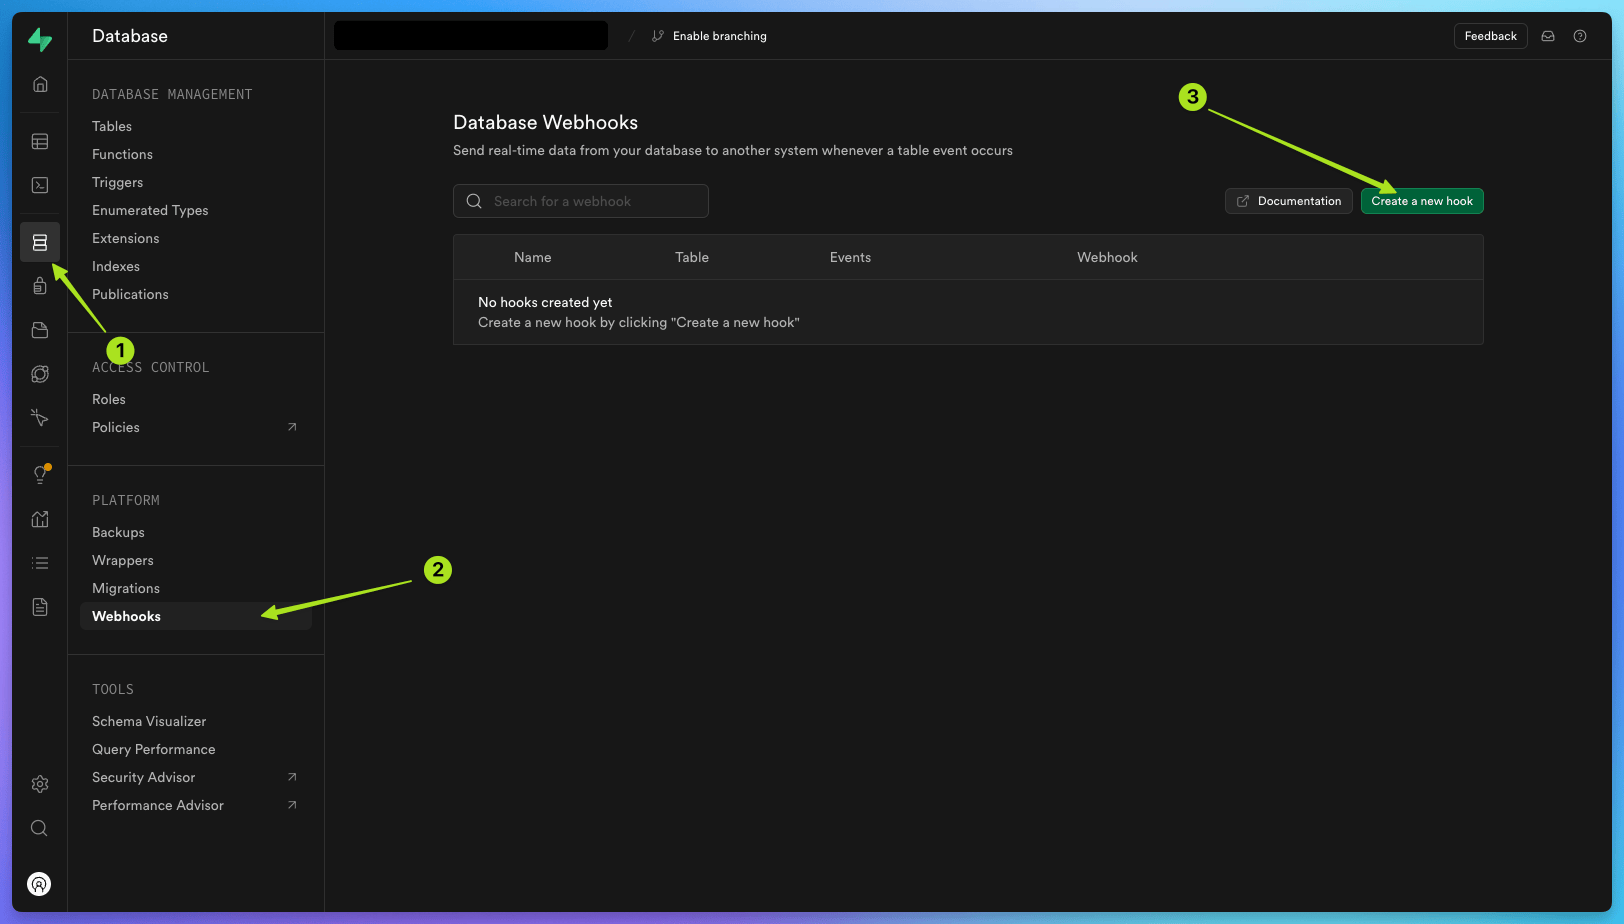 Call the hook
 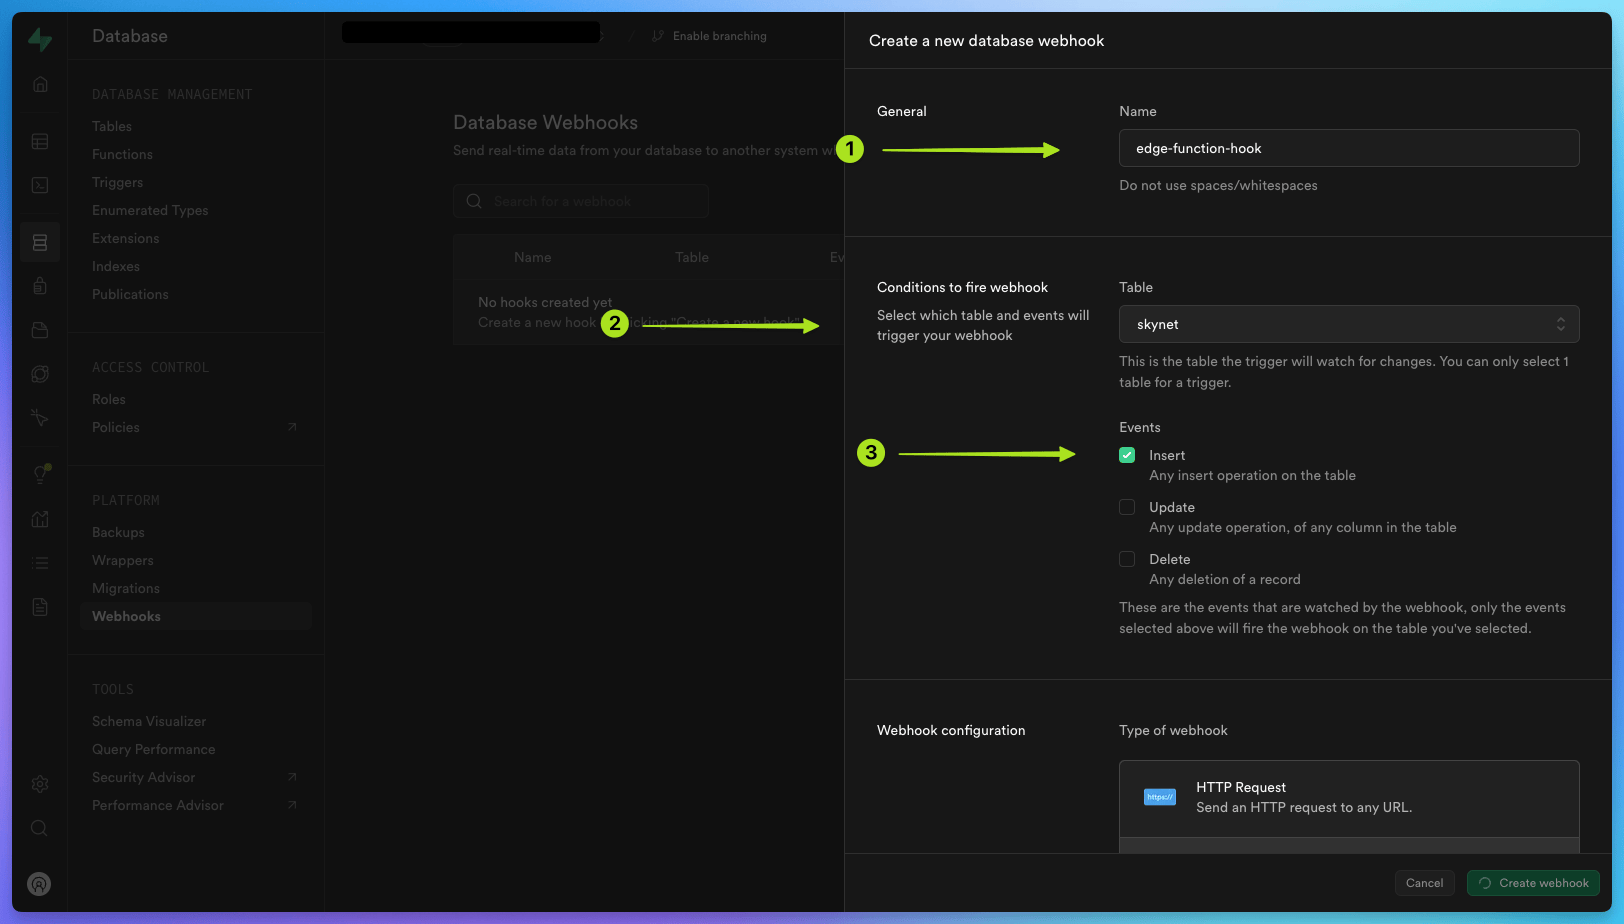 Under ‘Webhook configuration’, select
‘Supabase Edge functions’ Under ‘Edge function’, choose
Under ‘Webhook configuration’, select
‘Supabase Edge functions’ Under ‘Edge function’, choose 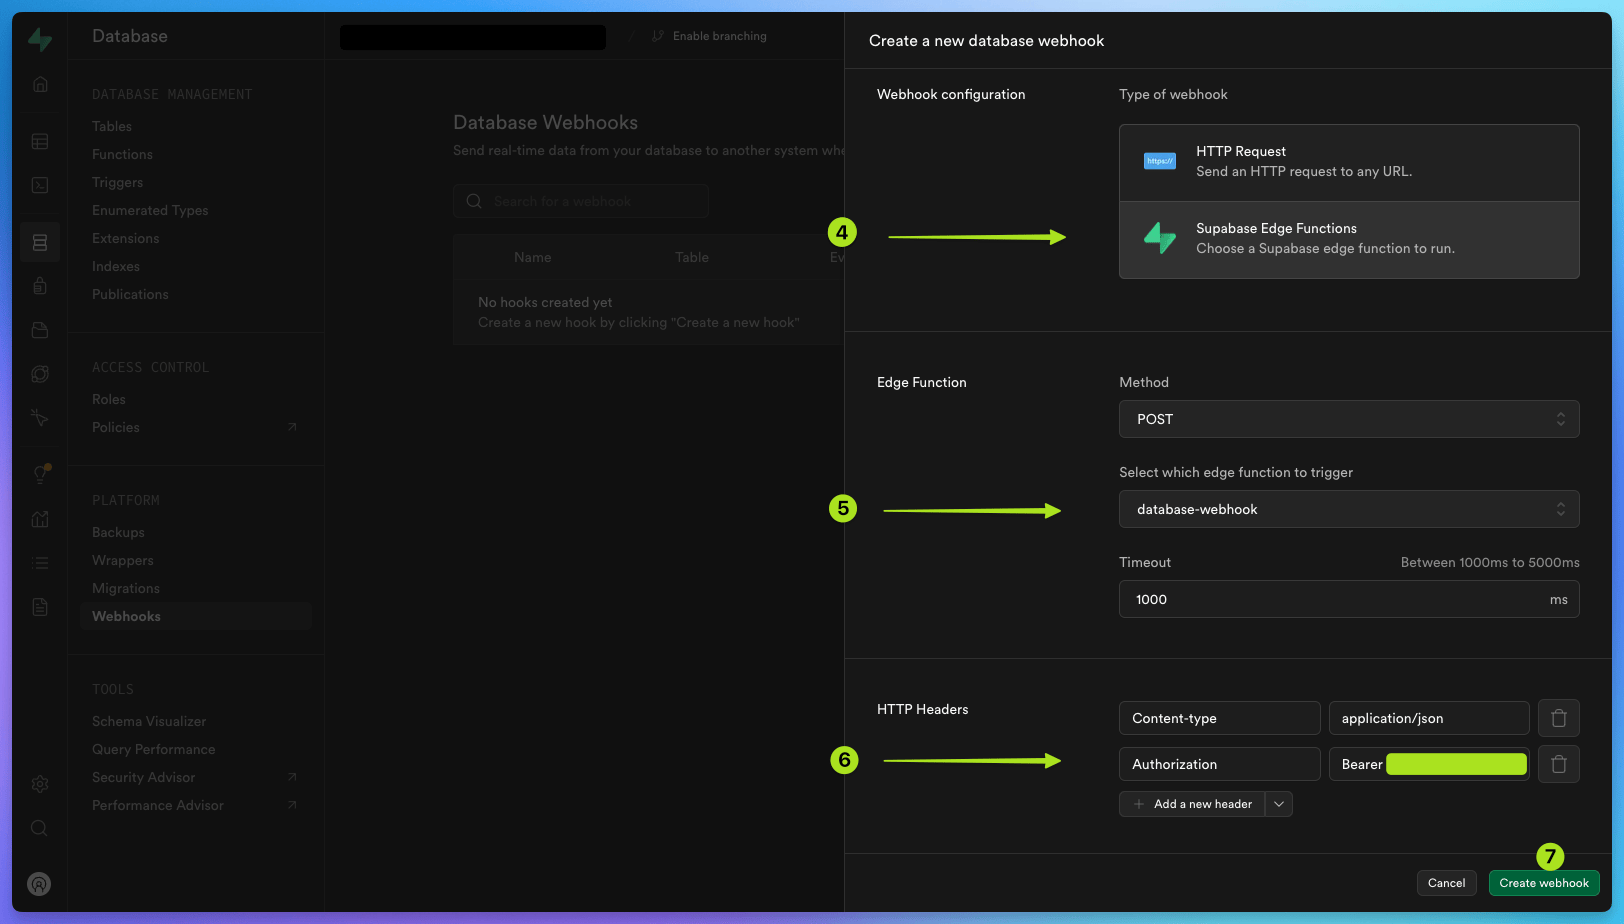 Your database webhook is now ready to use.
anon public API key from the table .Then, go to ‘Database’ click on ‘Webhooks’ , and then click ‘Create a new hook’ . Call the hook edge-function-hook. Select the new table you have created:
public skynet. Choose the insert event. Under ‘Webhook configuration’, select
‘Supabase Edge functions’ Under ‘Edge function’, choose POST
and select the edge function you have created: database-webhook. Under ‘HTTP Headers’, add a new header with the key Authorization and the value Bearer <your-api-key> (replace <your-api-key> with the anon public API key you copied earlier). Click ‘Create webhook’.Your database webhook is now ready to use.Deploy your task and trigger it from your new database-webhook edge function
Deploy your 'Hello World' task
The next step is to deploy your
hello-world task to Trigger.dev cloud.To do this, run the following command in the terminal:Trigger the task from your edge function
Your 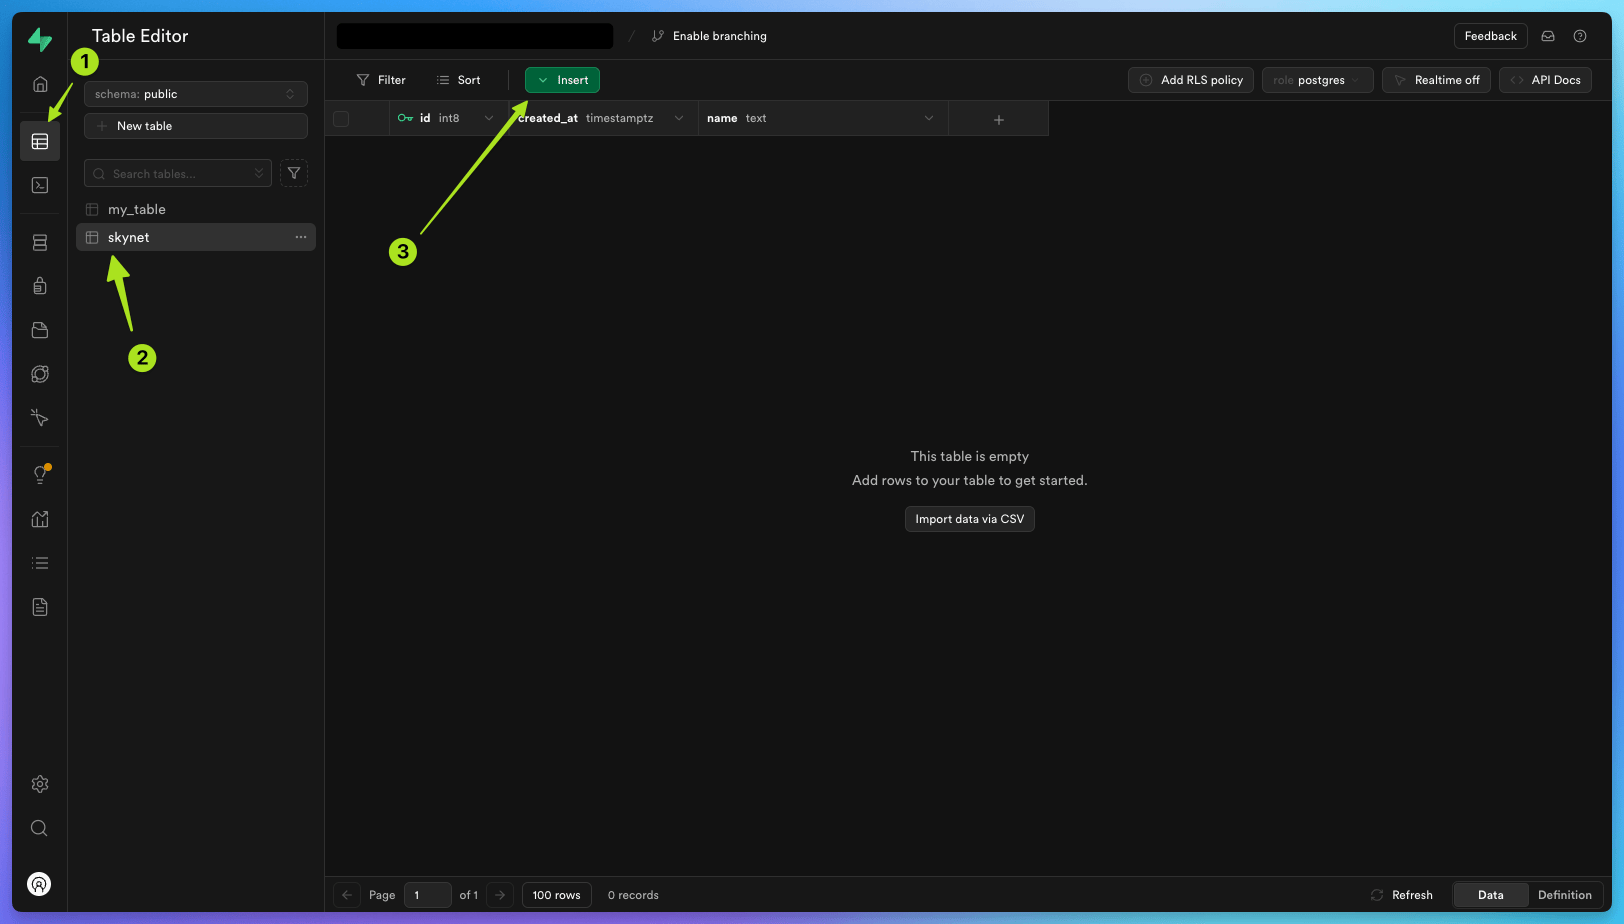 Add a new item under
 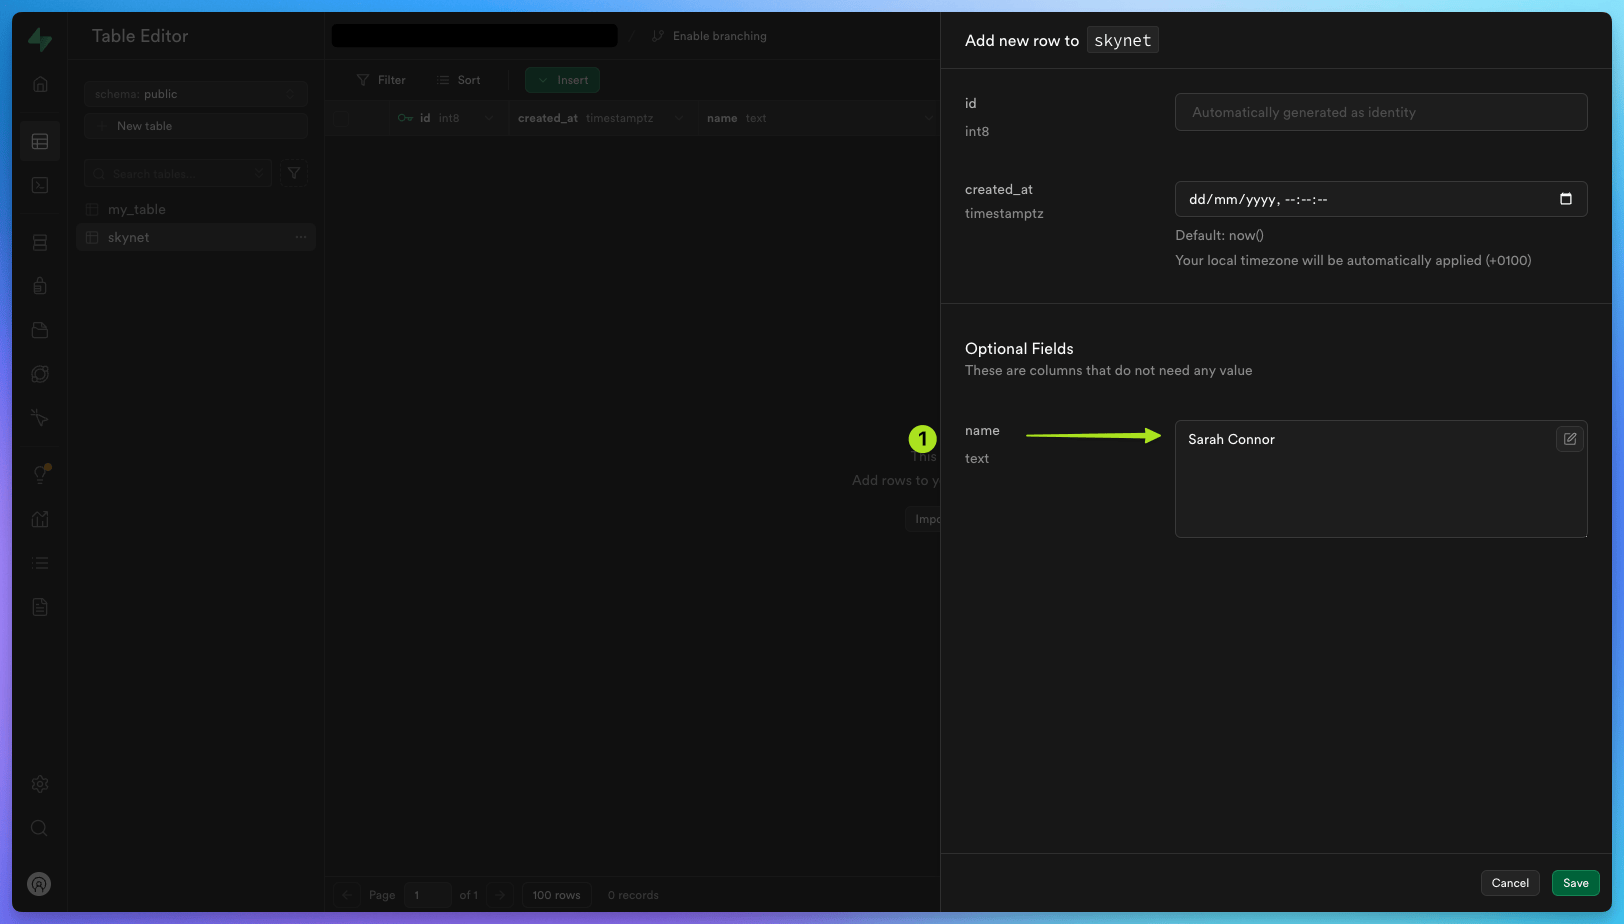 Go back to your edge function dashboard , and under ‘Logs’ you should see a new run of your
 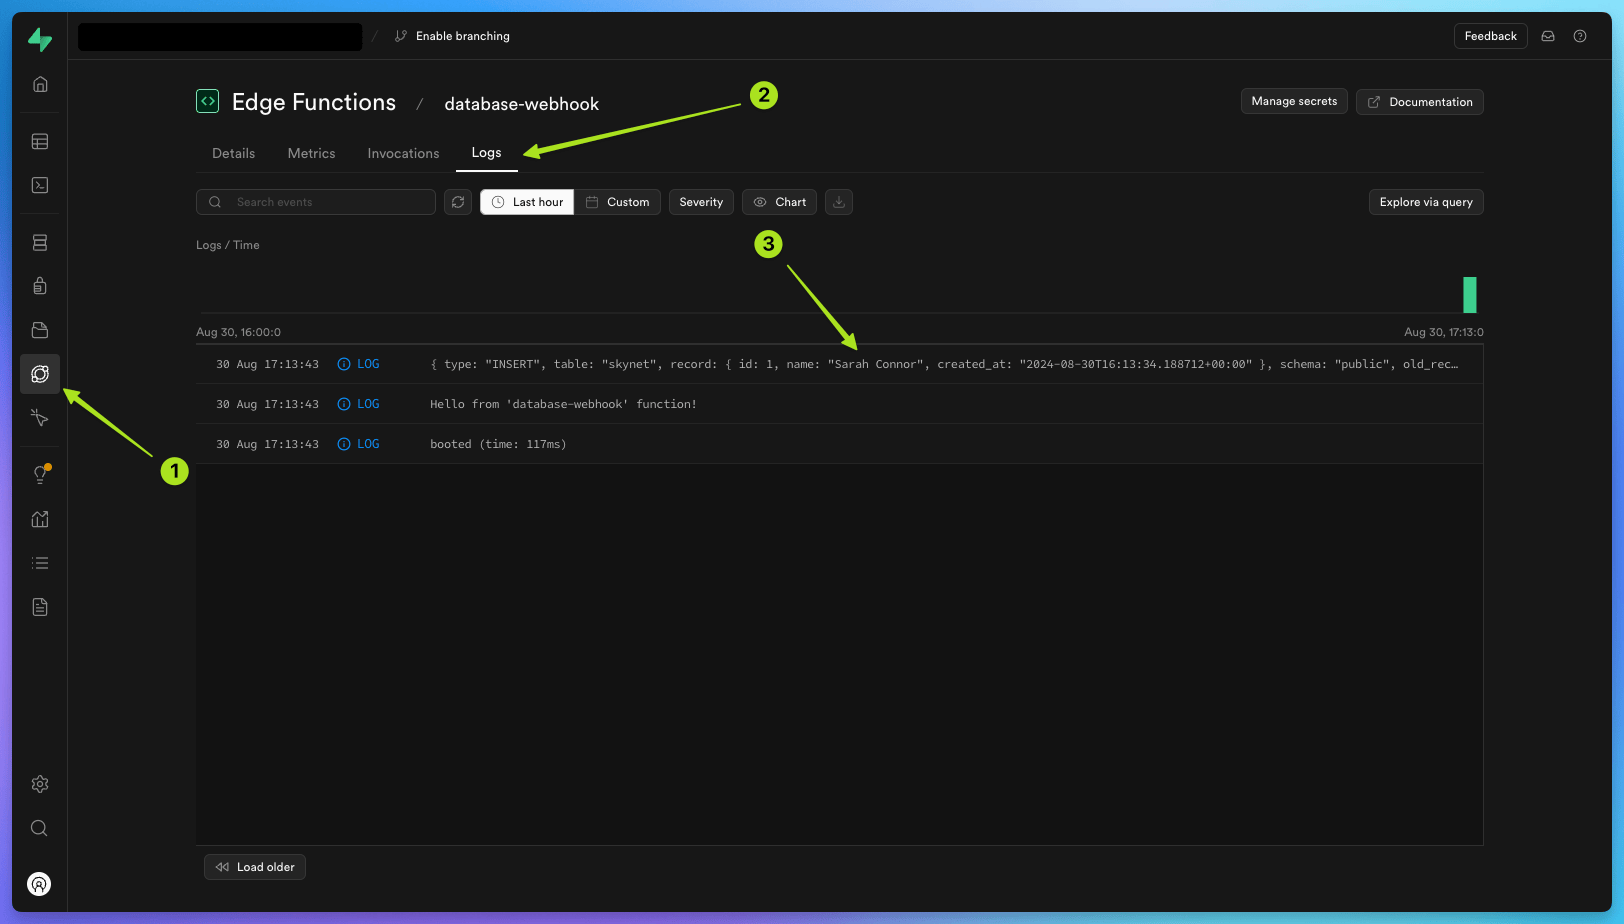 Then, check your cloud.trigger.dev project ‘Runs’ list and you should see a successful
 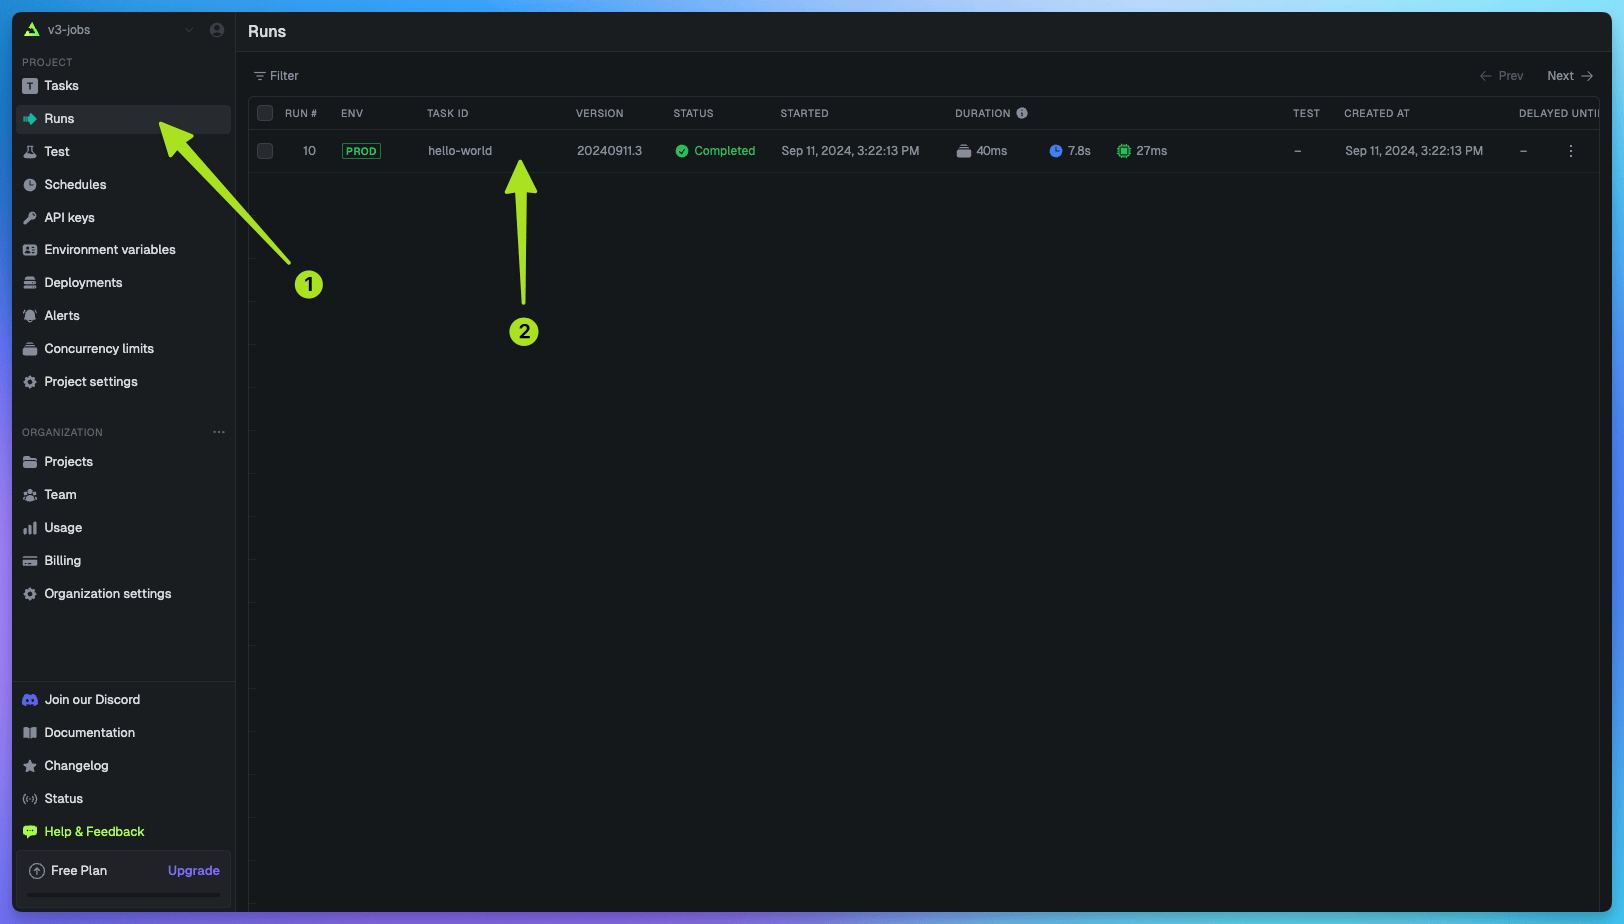 Congratulations, you have successfully triggered a task from a Supabase edge function using a database webhook!
database-webhook edge function is now set up to trigger the hello-world task every time a new row is inserted into your skynet table.To do this, go back to your Supabase project dashboard, click on ‘Table Editor’ in the left-hand menu, click on the skynet table , and then click ‘Insert’, ‘Insert Row’ .Add a new item under name, with the value Sarah Connor (this can be any string). Go back to your edge function dashboard , and under ‘Logs’ you should see a new run of your database-webhook edge function. Then, check your cloud.trigger.dev project ‘Runs’ list and you should see a successful hello-world task which has been triggered when you added a new row with the name Sarah Connor to your skynet Supabase table.Inside that run you will see the payload that was sent from the database webhook, including the name and other table information.Congratulations, you have successfully triggered a task from a Supabase edge function using a database webhook!Learn more about Supabase and Trigger.dev
Full walkthrough guides from development to deployment
Edge function hello world
Learn how to trigger a task from a Supabase edge function when a URL is visited.
Edge function database webhooks
Learn how to trigger a task from a Supabase edge function when an event occurs in your database.
Task examples with code you can copy and paste
Supabase database operations
Run basic CRUD operations on a table in a Supabase database using Trigger.dev.
Supabase Storage upload
Download a video from a URL and upload it to Supabase Storage using S3.